Module 4: Install the demo application and ingress gateway
This demo application is based on the Kiali Travel Demo Tutorial and will deploy several services grouped into three namespaces.
| To get a better understanding of the application architecture and components used throughout the lab, please refer to the following page: Understanding the Travel Demo Application |
Navigate to the subdirectory: 040-travel-demo-app
|
Task 1: Create the application namespaces
Create the namespaces for the Kiali Travel Demo with the following command:
apiVersion: v1
kind: Namespace
metadata:
  labels:
    istio-discovery: enabled
  name: travel-agency
spec: {}
---
apiVersion: v1
kind: Namespace
metadata:
  labels:
    istio-discovery: enabled
  name: travel-portal
spec: {}
---
apiVersion: v1
kind: Namespace
metadata:
  labels:
    istio-discovery: enabled
  name: travel-control
spec: {}
oc apply -f 01_1-ns-create.yamlThe namespaces are labeled with the configured istio discovery selector.
Task 2: Create pod monitors
PodMonitor objects must be applied in all mesh namespaces:
oc apply -f 01_2-pod-monitors-create.yamlTask 3: Deploy the application components
Step 1: Deploy the travel-agency components
oc apply -n travel-agency -f 02_1-travel-agency-app.yamlsecret/mysql-credentials created
service/mysqldb created
deployment.apps/mysqldb-v1 created
deployment.apps/cars-v1 created
service/cars created
deployment.apps/discounts-v1 created
service/discounts created
deployment.apps/flights-v1 created
service/flights created
deployment.apps/hotels-v1 created
service/hotels created
deployment.apps/insurances-v1 created
service/insurances created
deployment.apps/travels-v1 created
service/travels createdStep 2: Deploy the travel-portal components
oc apply -n travel-portal -f 02_2-travel-portal-app.yamldeployment.apps/voyages created
service/voyages created
deployment.apps/viaggi created
service/viaggi created
deployment.apps/travels created
service/travels createdStep 3: Deploy the travel-control components
oc apply -n travel-control -f 02_3-travel-control-app.yamldeployment.apps/control created
service/control createdStep 4: Create a Route for the Travel Control Dashboard
oc apply -f 02_4-travel-control-route.yamlGet the Travel Control Dashboard URL from the Route by running the following command:
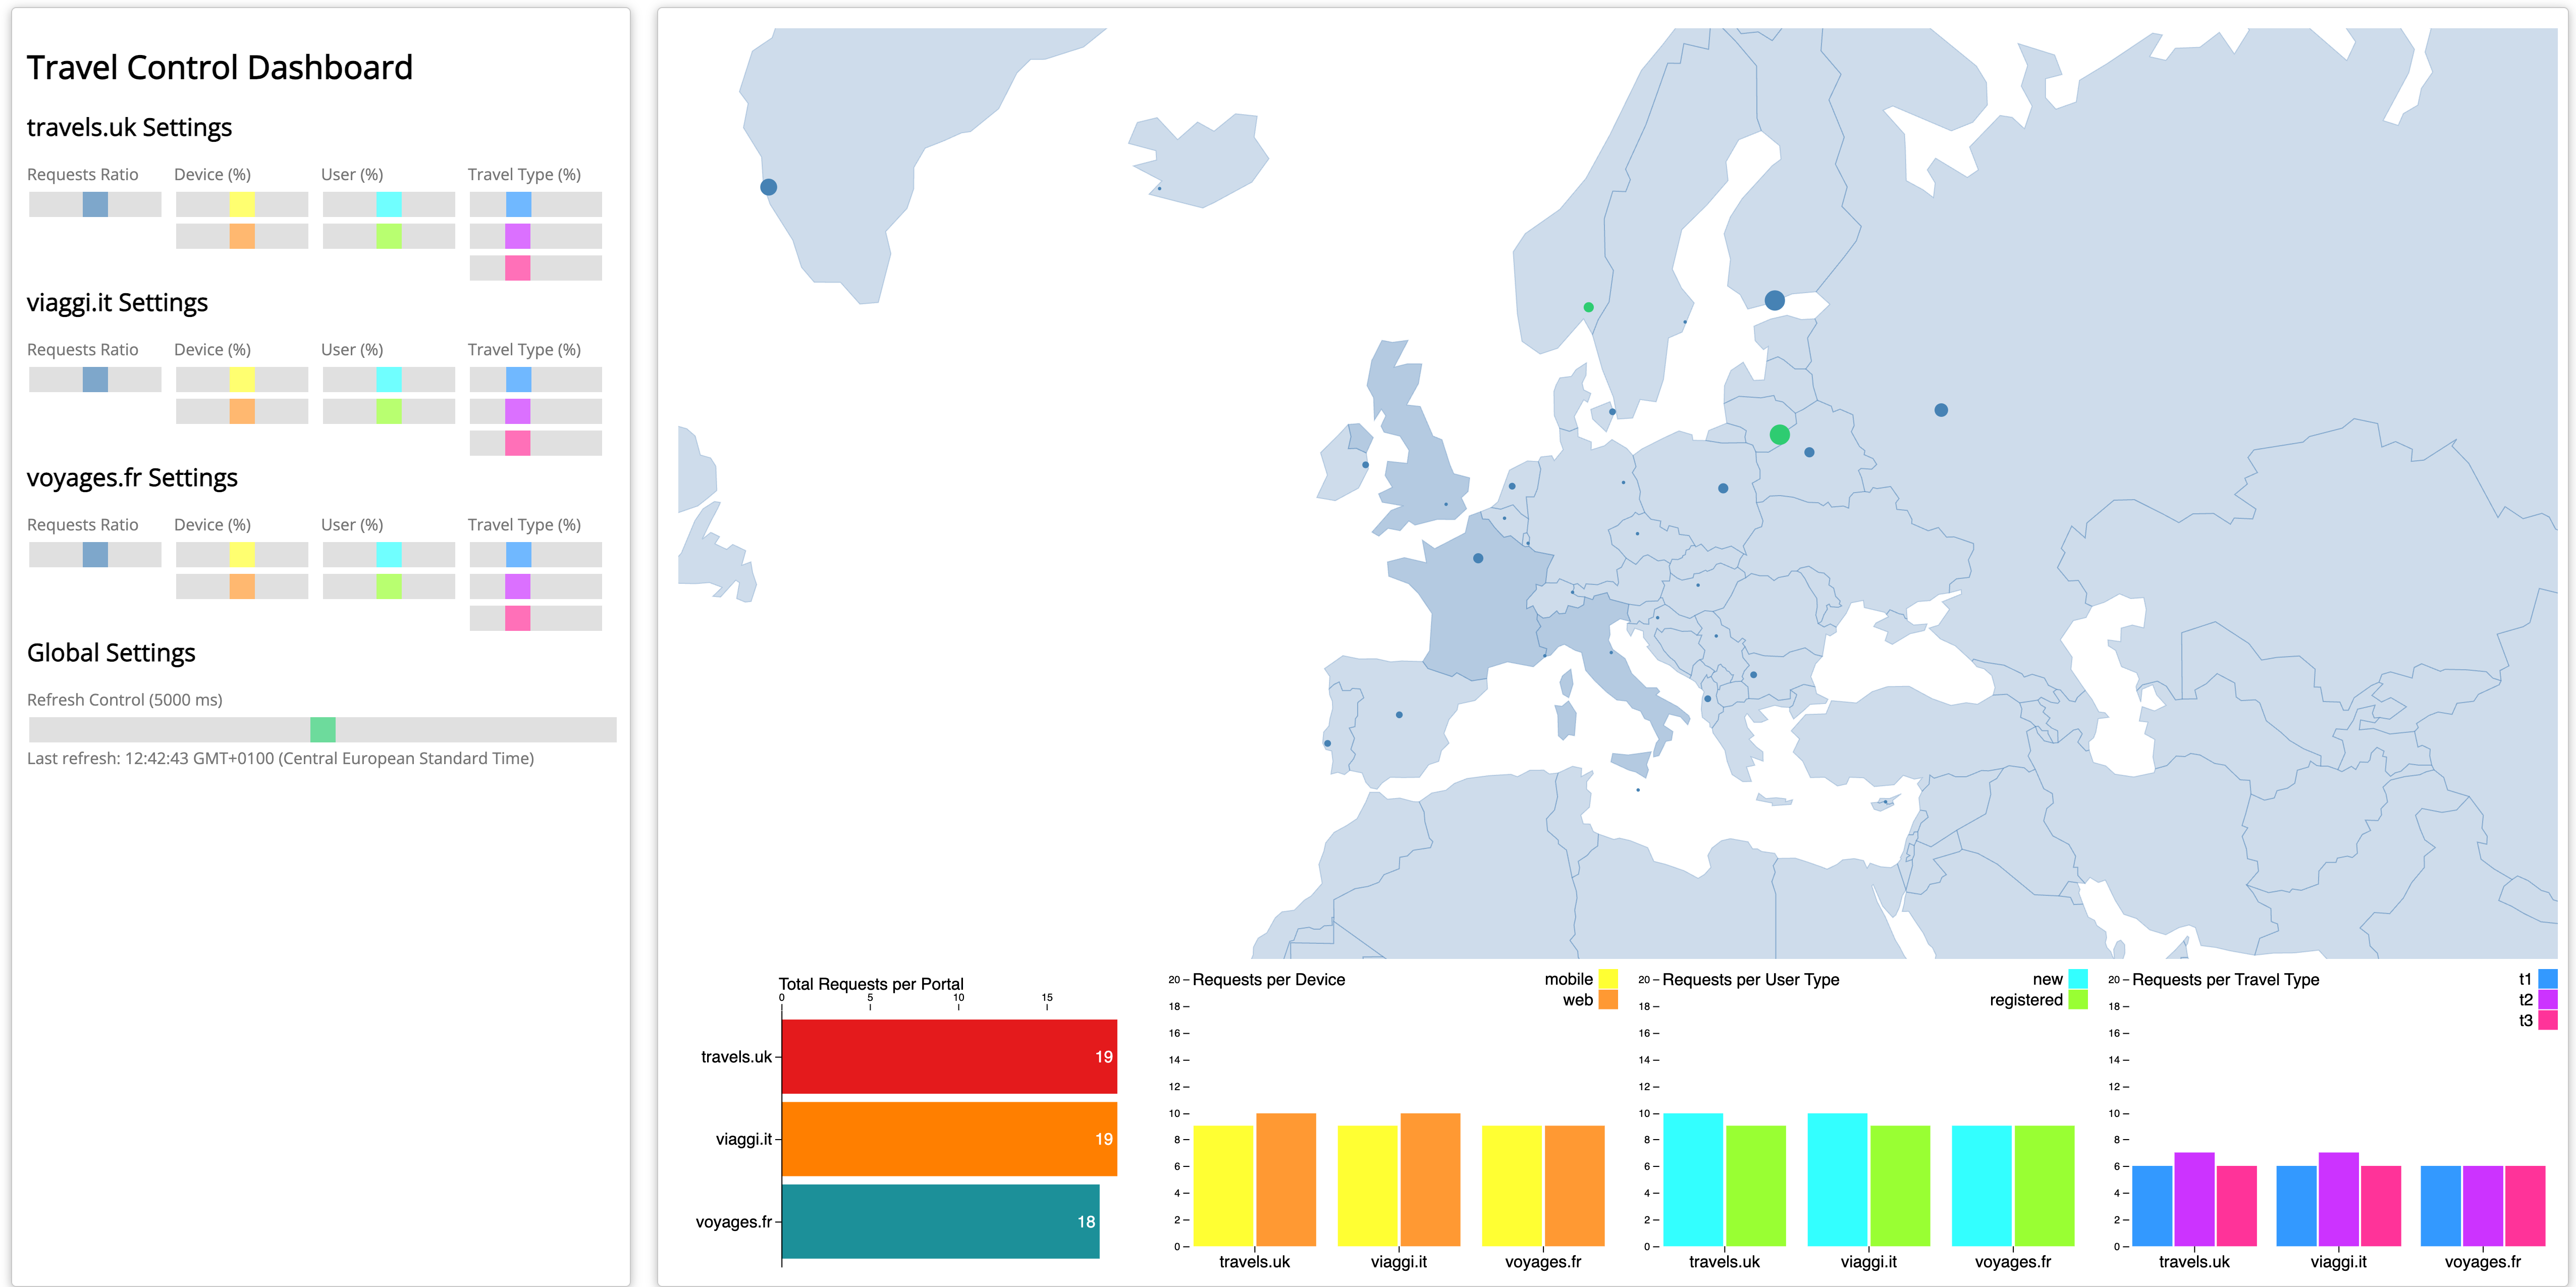
echo "https://$(oc get routes -n travel-control route-travel-control -o jsonpath='{.spec.host}')"Open the Dashboard and verify everything is working.
| Please keep the browser window open so that you continuously send requests to the backend. |
Task 4: Add the application to the Ambient Mesh
|
Right now, we have deployed the application components in namespaces, that are "visible" to the Istio control plane (due to discoverySelectors), but the application pods are not enrolled in the data plane. The application is treated as a standard Kubernetes workload. Even though Istio "knows" about the service, it knows that the specific pod does not have a proxy (ztunnel or sidecar) attached to it. |
We can verify this by the following command:
istioctl ztunnel-config workload -n ztunnelNAMESPACE POD NAME ADDRESS NODE WAYPOINT PROTOCOL
travel-agency cars-v1-75f98c6f58-6g8nv 10.130.1.114 master-0 None TCP
travel-agency discounts-v1-6dccdff9ff-dwflq 10.130.1.116 master-0 None TCP
travel-agency flights-v1-6b7b99b764-g44mc 10.130.1.117 master-0 None TCP
travel-agency hotels-v1-6bcc9b877d-bhbrq 10.129.1.105 master-1 None TCP
travel-agency insurances-v1-75cb48b577-nszkq 10.129.1.106 master-1 None TCP
travel-agency mysqldb-v1-6657d57779-frcfj 10.130.1.115 master-0 None TCP
travel-agency travels-v1-56895446c5-l6qmm 10.128.0.117 master-2 None TCP
travel-control control-6474d4c775-qt288 10.129.1.107 master-1 None TCP
travel-portal travels-6684f75cd5-lfd9m 10.130.1.119 master-0 None TCP
travel-portal viaggi-59988c897c-blffl 10.130.1.118 master-0 None TCP
travel-portal voyages-6c86bcdb5d-4zfzd 10.128.0.118 master-2 None TCP|
Key columns to watch: PROTOCOL:
WAYPOINT:
|
Now let’s add the application to the Ambient Mesh by labeling the namespaces with istio.io/dataplane-mode=ambient:
oc apply -f 03-ns-add-to-mesh.yamlVerify that the application is now part of the Mesh:
istioctl ztunnel-config workload -n ztunnelNAMESPACE POD NAME ADDRESS NODE WAYPOINT PROTOCOL
travel-agency cars-v1-75f98c6f58-6g8nv 10.130.1.114 master-0 None HBONE
travel-agency discounts-v1-6dccdff9ff-dwflq 10.130.1.116 master-0 None HBONE
travel-agency flights-v1-6b7b99b764-g44mc 10.130.1.117 master-0 None HBONE
travel-agency hotels-v1-6bcc9b877d-bhbrq 10.129.1.105 master-1 None HBONE
travel-agency insurances-v1-75cb48b577-nszkq 10.129.1.106 master-1 None HBONE
travel-agency mysqldb-v1-6657d57779-frcfj 10.130.1.115 master-0 None HBONE
travel-agency travels-v1-56895446c5-l6qmm 10.128.0.117 master-2 None HBONE
travel-control control-6474d4c775-qt288 10.129.1.107 master-1 None HBONE
travel-portal travels-6684f75cd5-lfd9m 10.130.1.119 master-0 None HBONE
travel-portal viaggi-59988c897c-blffl 10.130.1.118 master-0 None HBONE
travel-portal voyages-6c86bcdb5d-4zfzd 10.128.0.118 master-2 None HBONEHBONE stands for HTTP-Based Overlay Network Environment. It is the custom tunneling protocol Istio Ambient Mesh uses to transport traffic securely between nodes (Ztunnels) and Waypoint proxies.
After the label is applied, all L4 traffic to and from the ambient mesh is intercepted and secured via mutual TLS (mTLS) by the ztunnel.
| Congratulations! You have successfully added the Travel Demo to ambient mesh. No further configuration is required and also no restart of the workloads. |
I takes a few minutes until metrics are visible in the Service Mesh Console or Kiali.
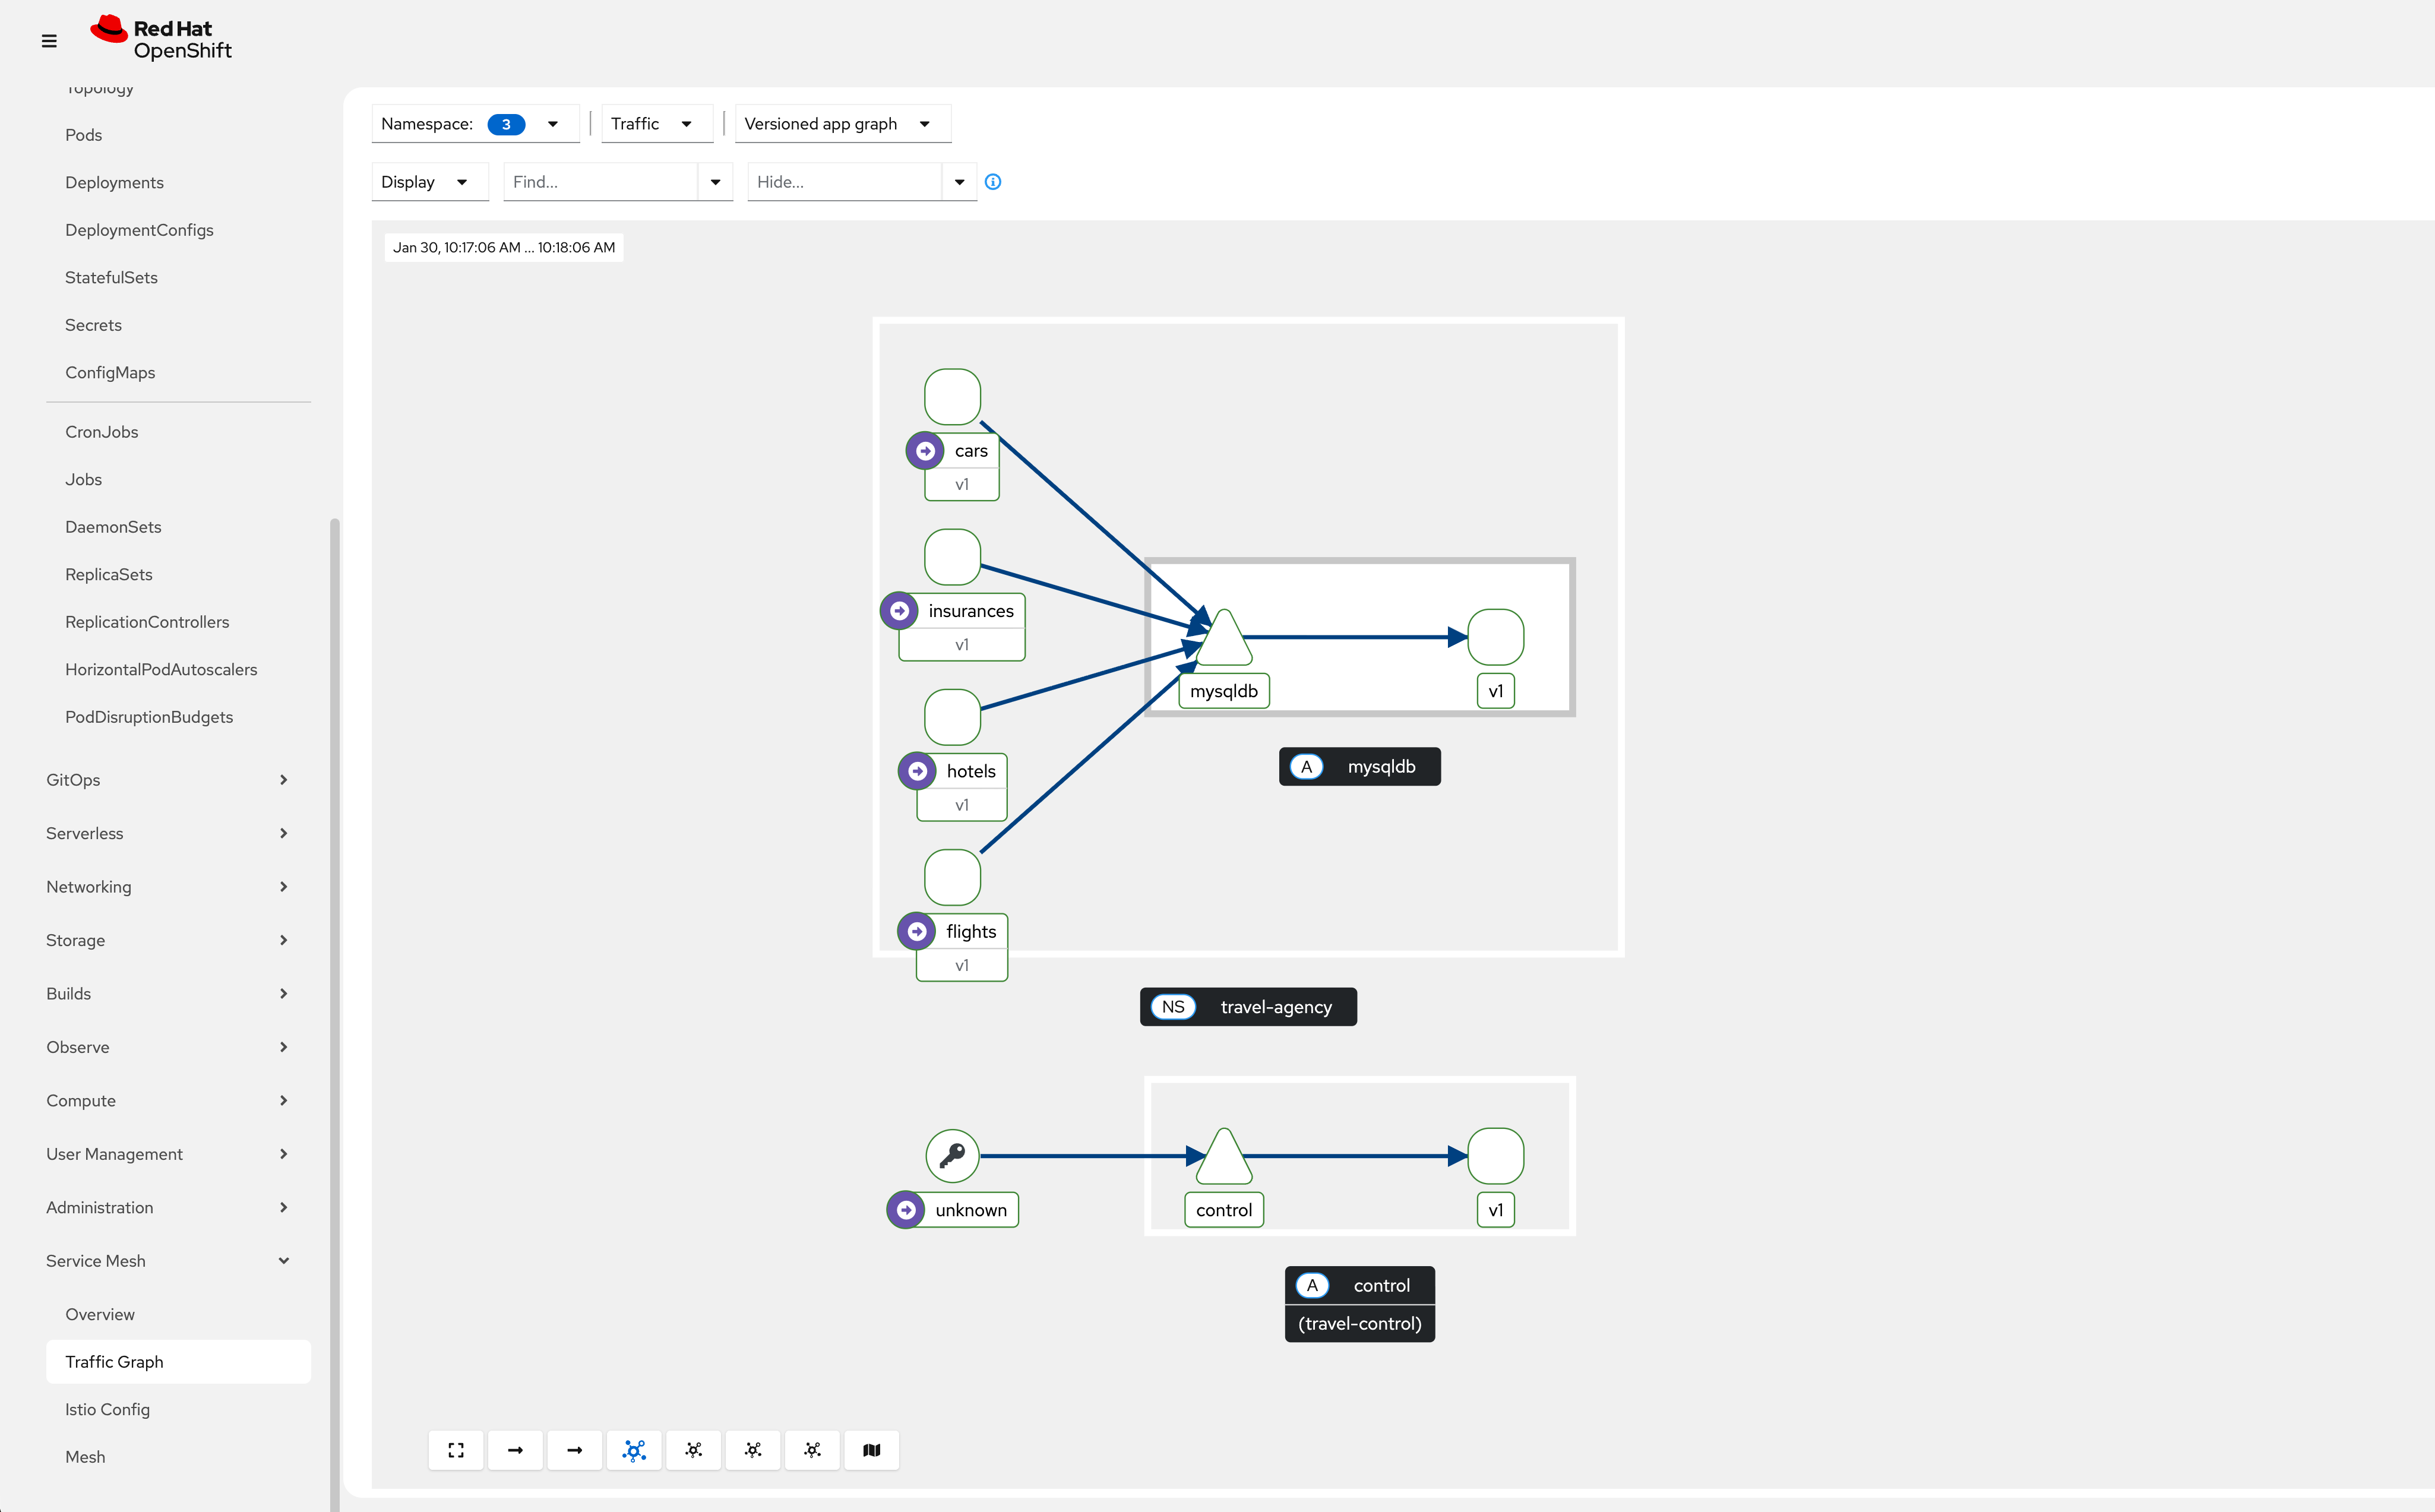
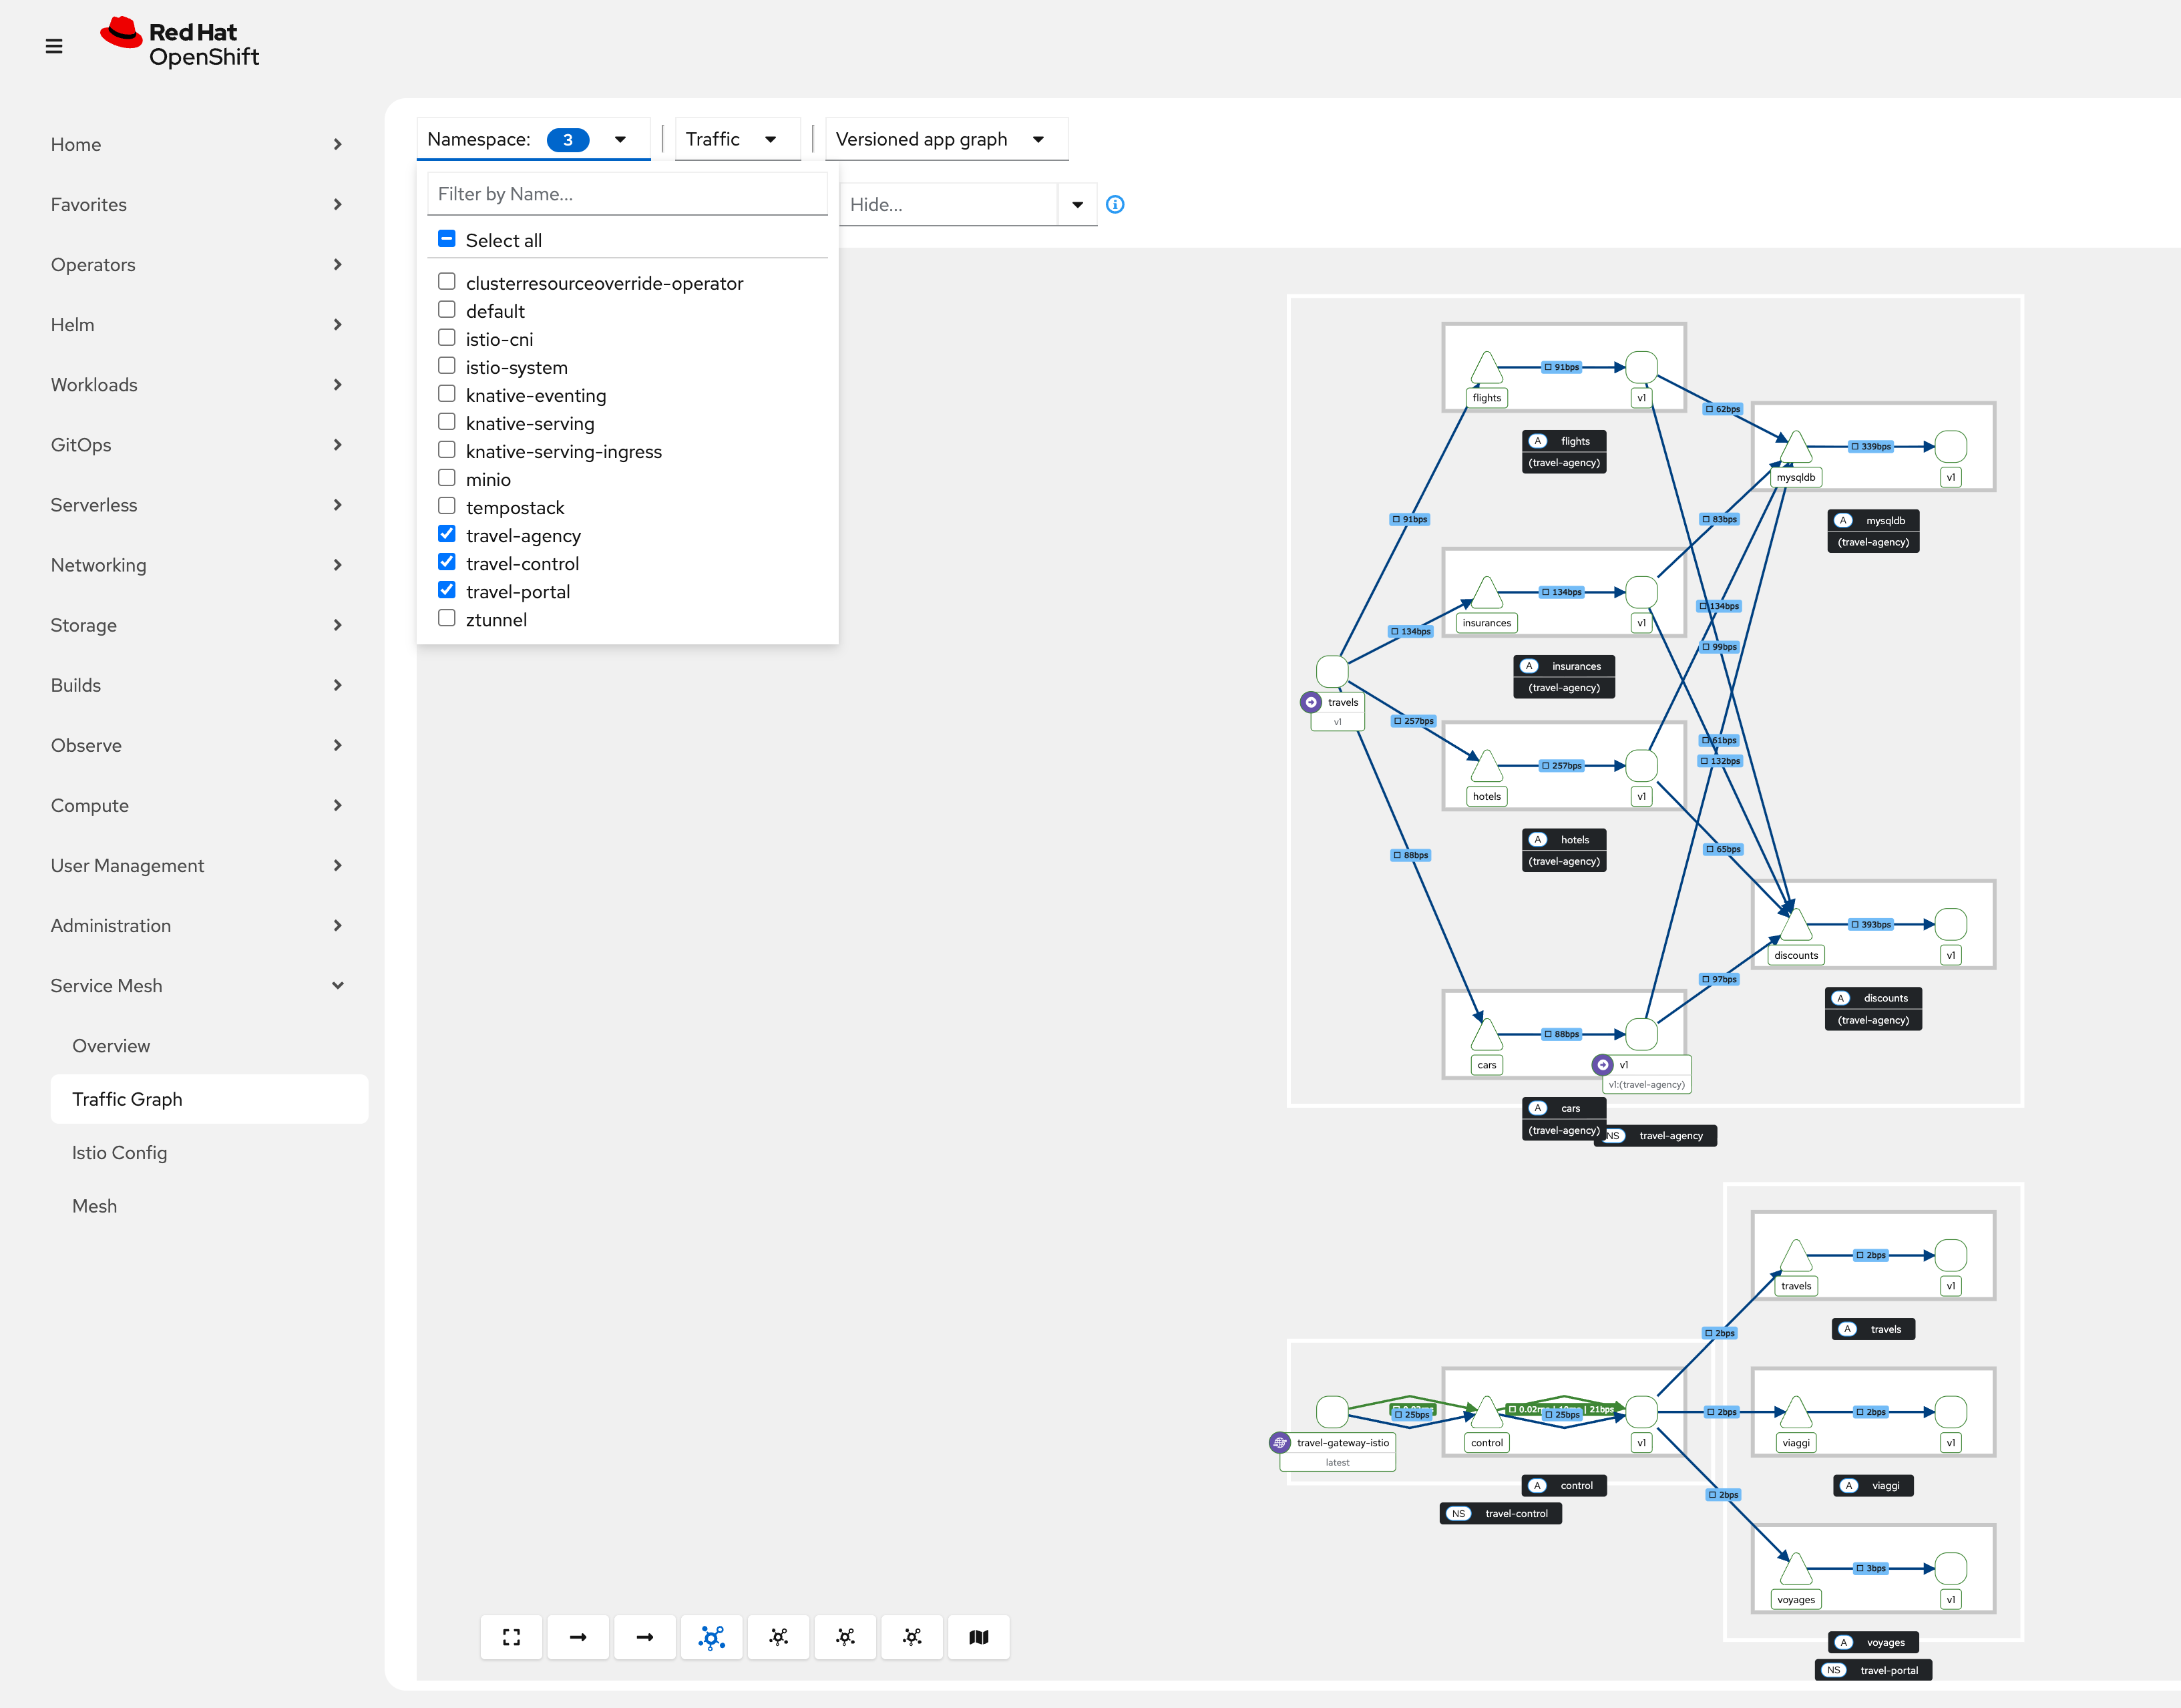
Go to Kiali or use the Service Mesh Console plugin to observe the traffic of the Travel Demo application. Navigate to Service Mesh → Traffic Graph, select the 3 travel demo namespaces and have a first look at the Versioned app graph:
What about Waypoint Proxies?
You can add a waypoint proxy if workloads require any of the following L7 capabilities:
|
Traffic management: - Advanced HTTP routing, load balancing, circuit breaking, rate limiting, fault injection, retries, and timeouts Security - Authorization policies based on L7 attributes such as request type or HTTP headers Observability - HTTP metrics, access logging, and tracing for application traffic |
Task 5: Configuring Ingress for the Travel Demo application
As of now, we have exposed the Travel Control Dashboard with an OpenShift route that sends traffic directly to the control service in plaintext.
In the next section, we will configure an Ingress Gateway in the Ambient Mesh to securely expose the Travel demo application.
The objective is to configure the following setup:
External traffic (TLS)-> Ingress Gateway (mTLS)-> Waypoint Proxy (mTLS)-> control service.|
In this setup, it is recommended to:
|
Step 1: Create an Ingress Gateway
A gateway resource configures a load balancer to receive incoming traffic from outside the mesh or send traffic outside the mesh. It defines ports, protocols, and accepted hosts.
The gateway resource defines the following attributes:
-
Port configuration: number, name, protocol
-
Accepted hostnames: can use wildcards
-
TLS settings: for HTTPS traffic
-
Selector: to specify which gateway pods apply this configuration
A gateway by itself does not route traffic to backend services. You must bind a HTTPRoute or virtual service to the gateway to define routing rules.
|
The following configuration is defining a basic Ingress Gateway and an HTTPRoute using the Kubernetes Gateway API, which Istio fully supports and implements. It’s essentially setting up the public entry point for HTTP traffic and routing all incoming requests to the control service.
apiVersion: gateway.networking.k8s.io/v1
kind: Gateway
metadata:
  name: travel-gateway
  namespace: travel-control
spec:
  gatewayClassName: istio
  listeners:
  - name: default
    port: 80
    protocol: HTTP
    allowedRoutes:
      namespaces:
        from: All
---
apiVersion: gateway.networking.k8s.io/v1
kind: HTTPRoute
metadata:
  name: travel-gateway-default-route
  namespace: travel-control
spec:
  parentRefs:
  - name: travel-gateway
  rules:
  - matches:
    - path:
        type: PathPrefix
        value: /
    backendRefs:
    - name: control
      port: 8080
oc apply -f 04_3-ingress-gateway-create.yamlStep 2: Create a Waypoint Proxy
Create a waypoint proxy in the travel-control namespace:
apiVersion: gateway.networking.k8s.io/v1
kind: Gateway
metadata:
  name: travel-control-waypoint
  namespace: travel-control
  labels:
    istio.io/waypoint-for: service
spec:
  gatewayClassName: istio-waypoint
  listeners:
  - name: mesh
    port: 15008
    protocol: HBONE
oc apply -f 04_1-control-waypoint-create.yamlStep 3: Label the travel-control namespace to use the waypoint
Now label the namespace to enroll all services in the travel-control namespace to use this waypoint.
apiVersion: v1
kind: Namespace
metadata:
  labels:
    istio-discovery: enabled
    istio.io/dataplane-mode: ambient
    istio.io/use-waypoint: travel-control-waypoint
  name: travel-control
spec: {}
oc apply -f 04_2-label-ns-for-waypoint.yamlStep 4: Label the control service
| Istio is sending traffic from the ingress gateway to the destination directly, even if that specific destination is enrolled in a waypoint. |
We can enable ingress waypoint routing on a service, such that traffic will be sent from the ingress gateway to the configured waypoint first, not to the destination service.
In order to enable ingress waypoint routing, label the control service.
The traffic entering the Ingress Gateway will then be forwarded to the Waypoint proxy for L7 policy enforcement.
apiVersion: v1
kind: Service
metadata:
  name: control
  namespace: travel-control
  labels:
    app: control
    istio.io/ingress-use-waypoint: "true"
spec:
  ports:
    - name: http
      port: 8080
  selector:
    app: control
oc apply -f 04_4-label-ingress-use-waypoint.yamlStep 5: Create an example waypoint policy
Deploy an example routing policy that is enforced at the ingress waypoint proxy:
oc apply -f 05_1-waypoint-routing.yamlStep 6: Expose the Ingress Gateway
In the last step, expose the Ingress Gateway with an OpenShift Route to be accessible from outside the cluster:
oc apply -f 05-ingress-gateway-route.yamlYou can now access the Travel Control Dashboard through the Service Mesh Ingress Gateway:
echo "https://$(oc get routes -n travel-control travel-gateway -o jsonpath='{.spec.host}')"| Again, please keep the browser window open so that you continuously send requests to the backend. |
Clean up the previous route to the control service:
oc delete -f 02_4-travel-control-route.yamlTask 6: Observe the Travel Demo application
Go to Kiali or use the Service Mesh Console plugin to observe the traffic of the Travel Demo application. Navigate to Service Mesh → Traffic Graph, select the 3 travel demo namespaces and have a look at the Versioned app graph
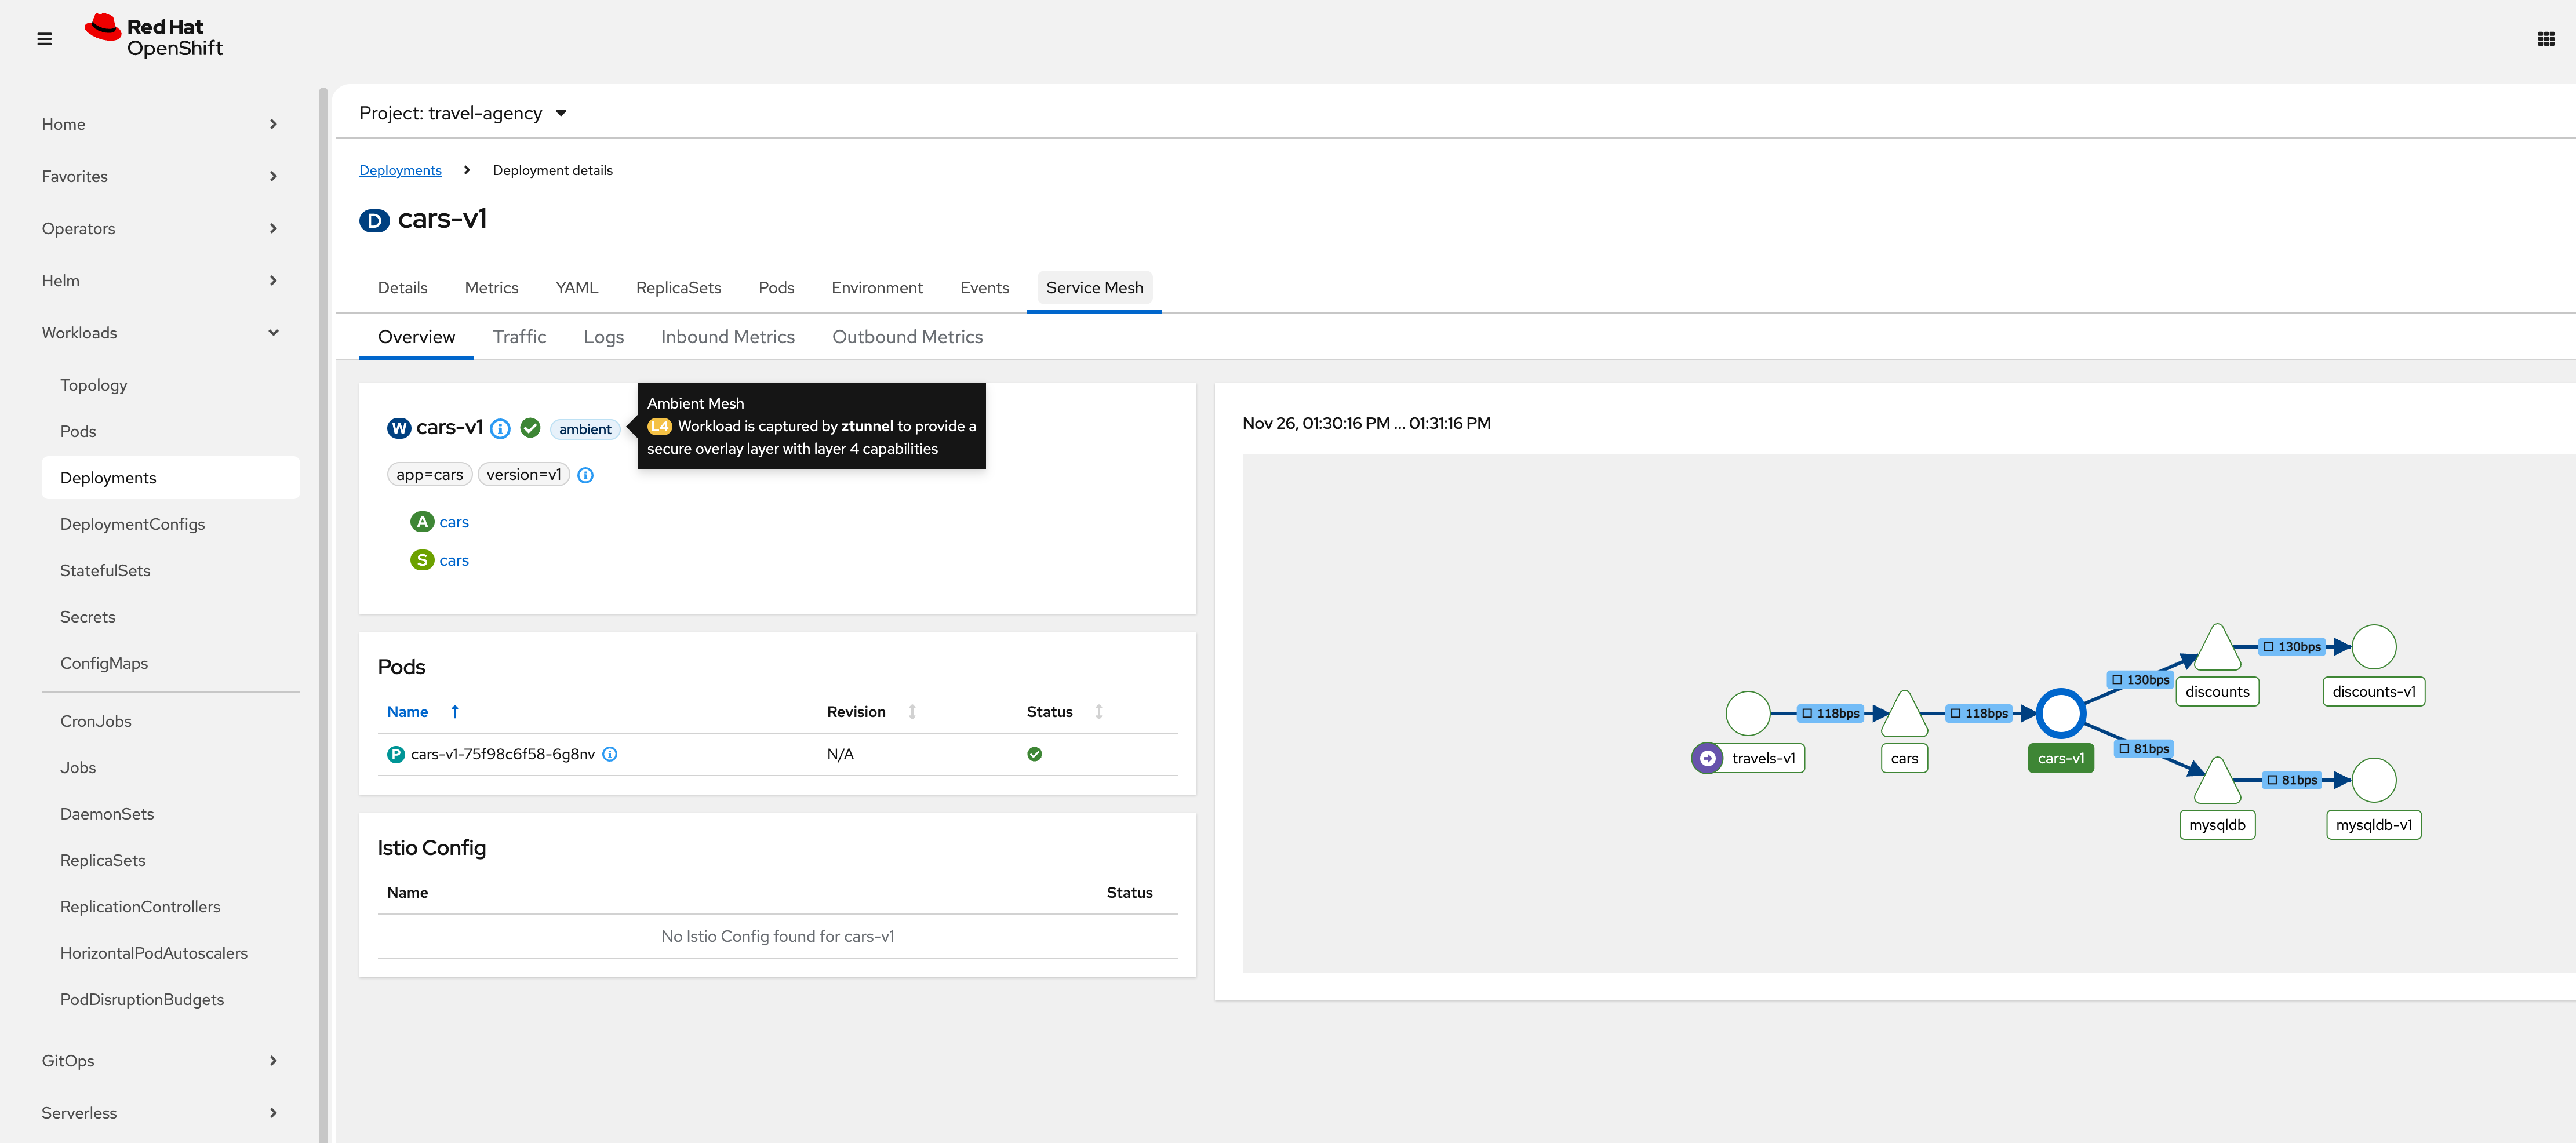
In the OpenShift Console, select the travel-agency project and navigate to Workloads → Deployments. Select .i.e the cars-v1 deployment and click on the Service Mesh tab:
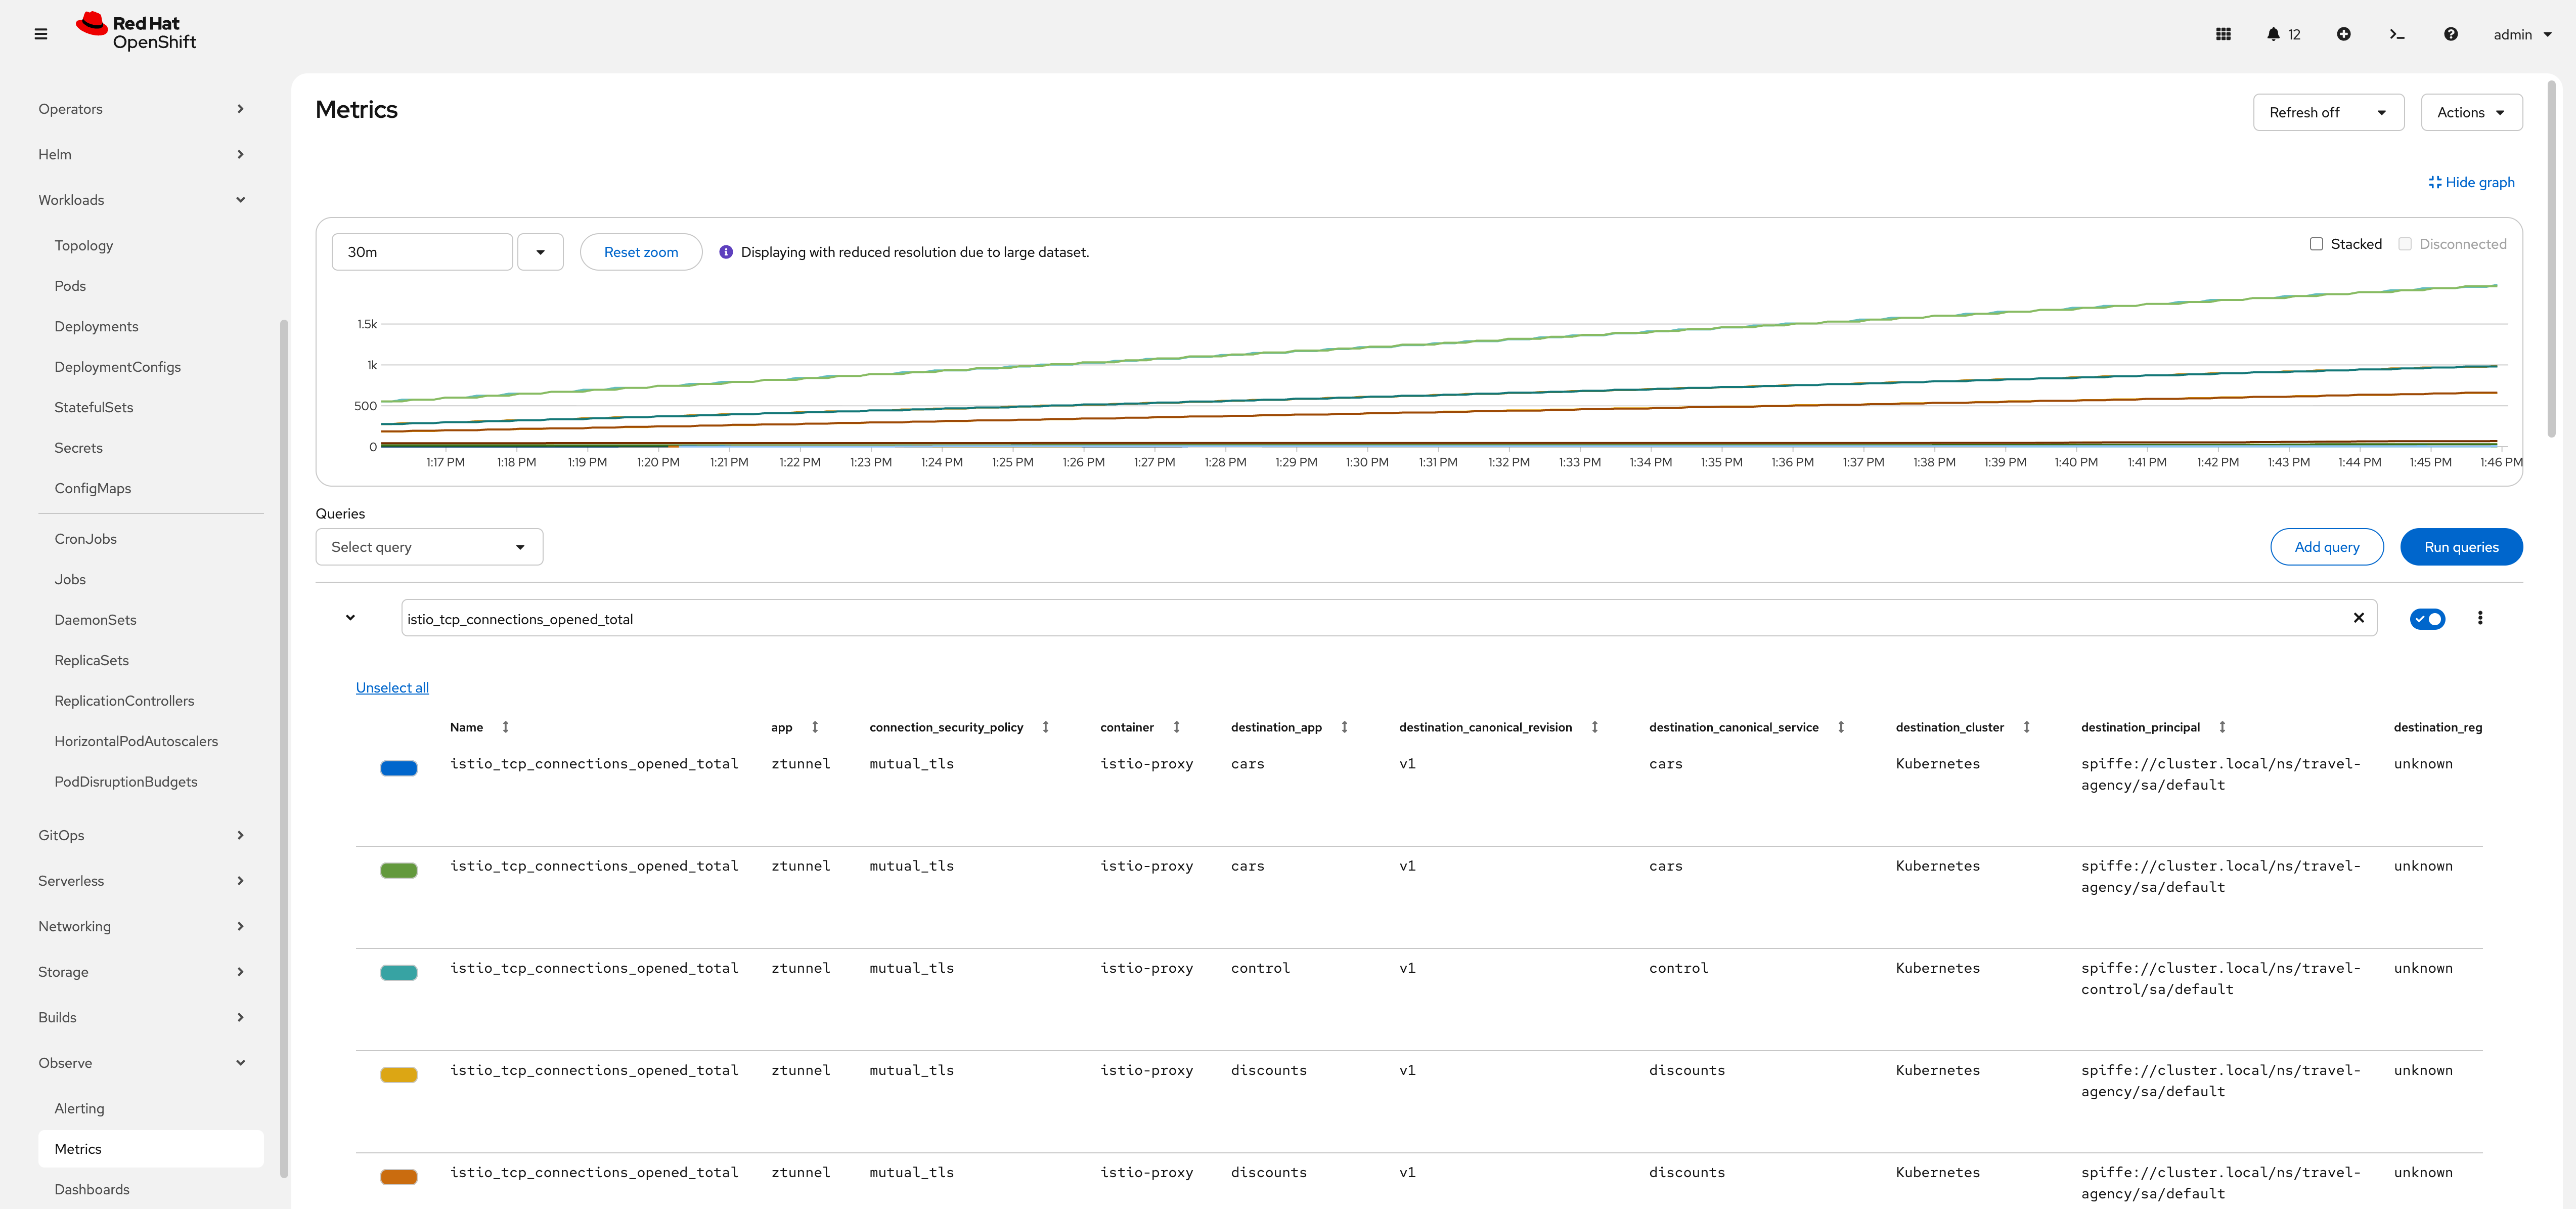
In the OpenShift Console, go to Observe → Metrics and run the query: istio_tcp_connections_opened_total to verify that ztunnel uses mTLS:
Task 7: Enable Tracing for the Ingress Gateway and Waypoint Proxy
The following Telemetry resources configure tracing for the travel-gateway and travel-control-waypoint in the travel-control namespace.
It tells Istio to use the OpenTelemetry provider named otel when emitting traces.
It enables probabilistic sampling, capturing 50% of requests that pass through that Gateway or waypoint. Other workloads or gateways are not affected unless they have their own Telemetry config.
apiVersion: telemetry.istio.io/v1
kind: Telemetry
metadata:
name: telemetry-gateway
namespace: travel-control
spec:
targetRefs:
- kind: Gateway
name: travel-gateway
group: gateway.networking.k8s.io
tracing:
- providers:
- name: "otel"
randomSamplingPercentage: 50
---
apiVersion: telemetry.istio.io/v1
kind: Telemetry
metadata:
name: telemetry-waypoint
namespace: travel-control
spec:
targetRefs:
- kind: Gateway
name: travel-control-waypoint
group: gateway.networking.k8s.io
tracing:
- providers:
- name: "otel"
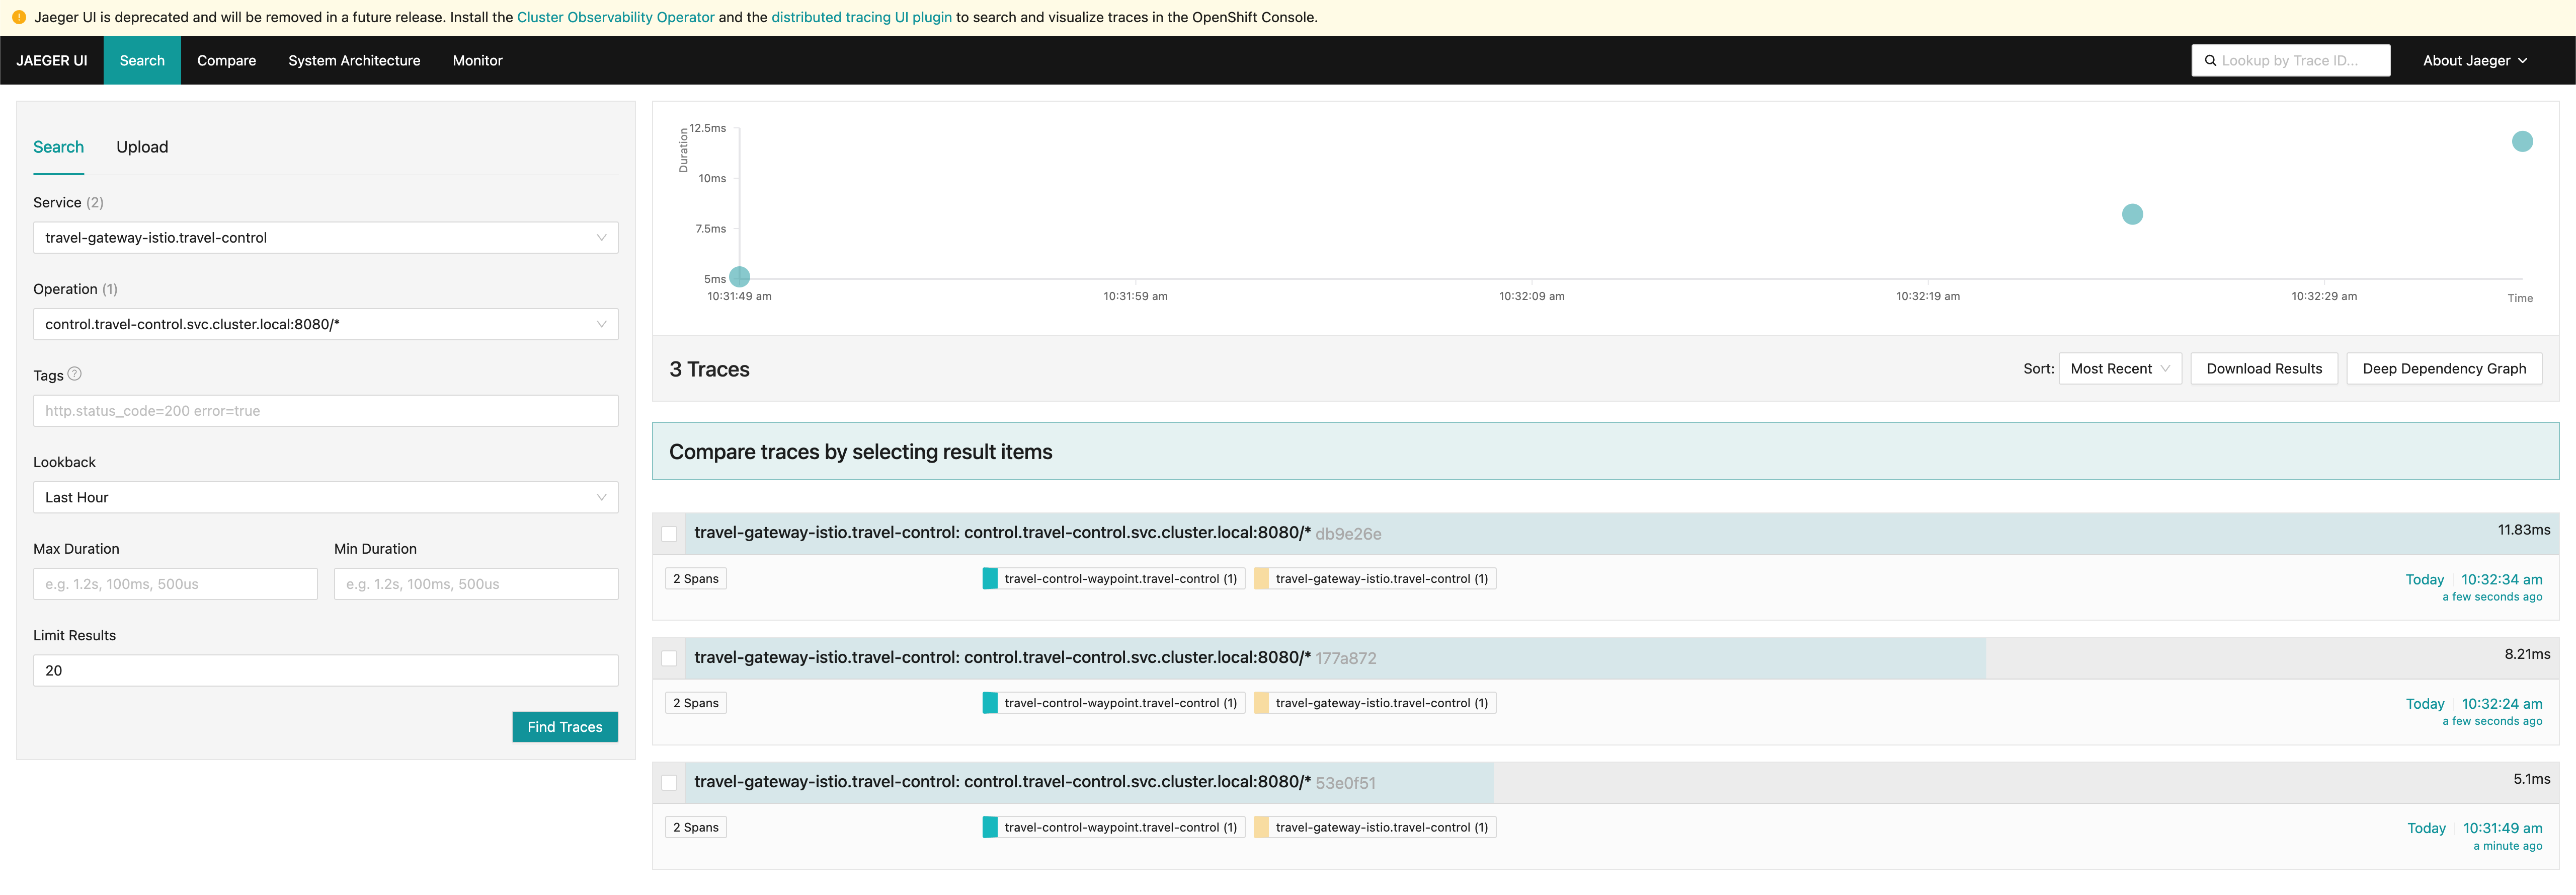
randomSamplingPercentage: 50oc apply -f 07-enable-tracing.yamlAfter a few minutes, you should be able to see traces in the Jaeger UI:
| Congratulations! You have successfully deployed the Kiali Travel Demo application in Ambient Mesh with an Ingress Gateway and Waypoint Proxy! |